
Renting cloud GPUs for machine learning experiments, image generation, or testing open-weight language models gets expensive quickly. Kaggle provides verified users with free weekly GPU compute quotas, including access to 2× NVIDIA Tesla T4 GPUs delivering 32GB of combined VRAM (16GB per card).
This guide walks through the exact setup process on Kaggle: registering, completing phone verification, creating a notebook, importing your code, enabling the dual T4 accelerator, running the code cell by cell, and deploying a private 27B-parameter AI server powered by Ollama, speculative decoding (MTP), and a Cloudflare Quick Tunnel.
Hardware Overview: What You Get
When you select the 2× T4 configuration on Kaggle, the environment provides:
- 2× NVIDIA Tesla T4 GPUs (Turing architecture)
- 16GB GDDR6 VRAM per card (32GB combined total)
- 30 hours per week of free GPU quota (resets weekly)
- Pre-installed CUDA drivers, PyTorch, TensorFlow, and common data science libraries
- Browser-based Jupyter notebook interface with up to 20GB of persistent working disk
Important memory consideration: 32GB total VRAM across two cards does not function as a single 32GB unified pool. Each GPU maintains its own 16GB memory space. To utilize both cards for running larger models (such as 27B Q4_K_M weights), the runtime must distribute model layers across GPU 0 and GPU 1.
Step 1: Create an Account and Sign In
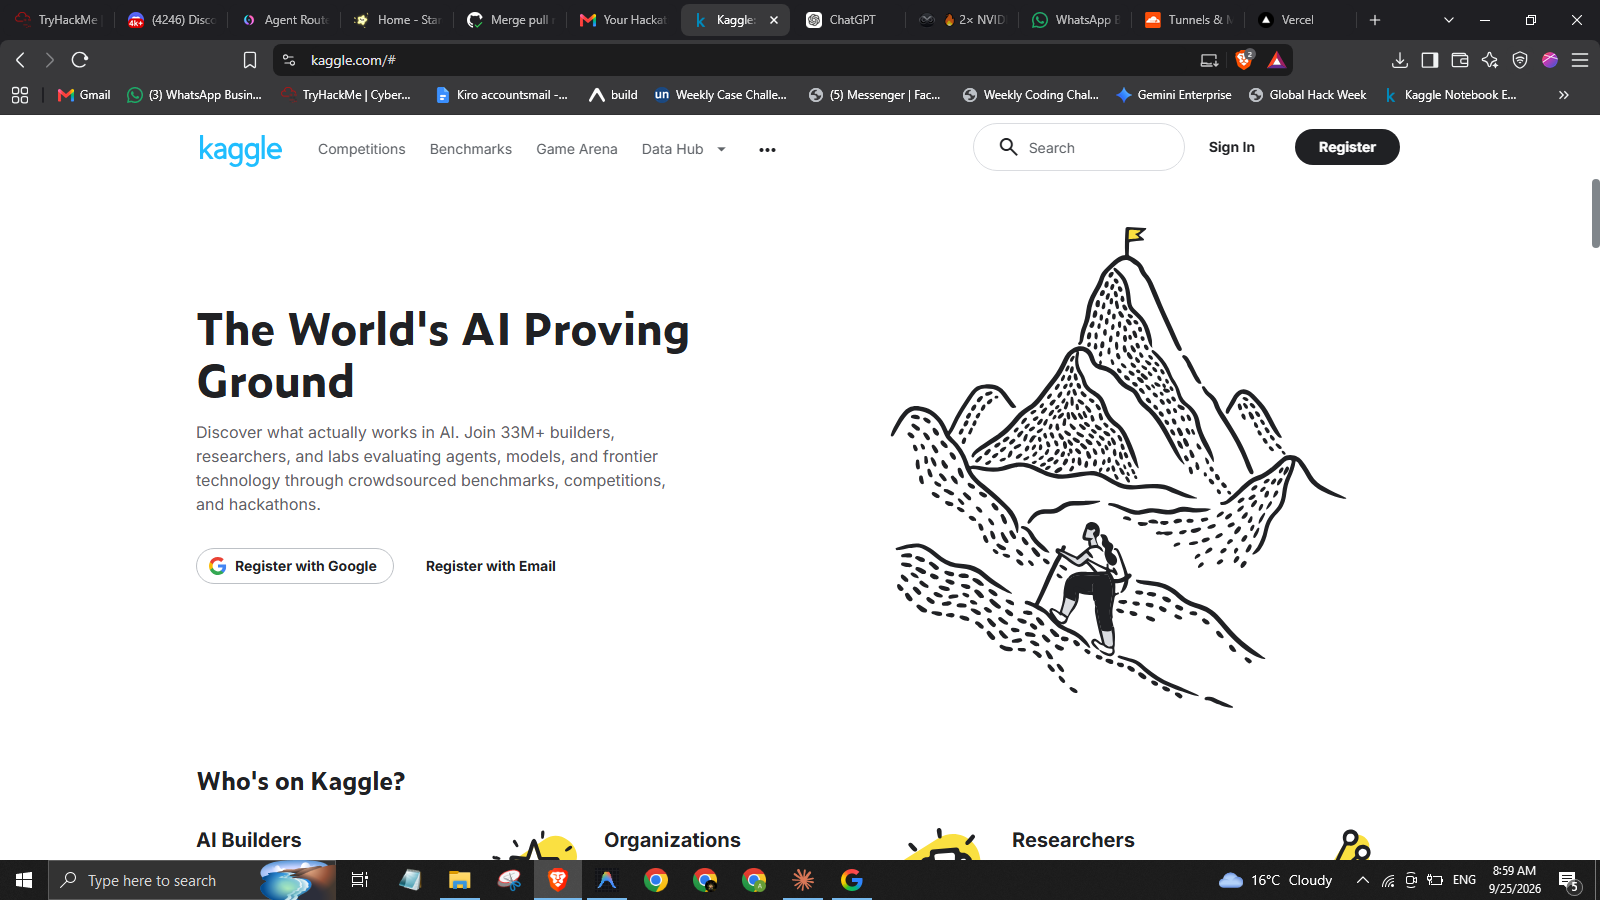
Go to Kaggle and sign in. If you do not have an account, click Register to sign up with Google or your email.
Step 2: Verify Your Phone Number
Kaggle requires SMS phone verification before granting access to GPU accelerators and internet connectivity inside notebooks.
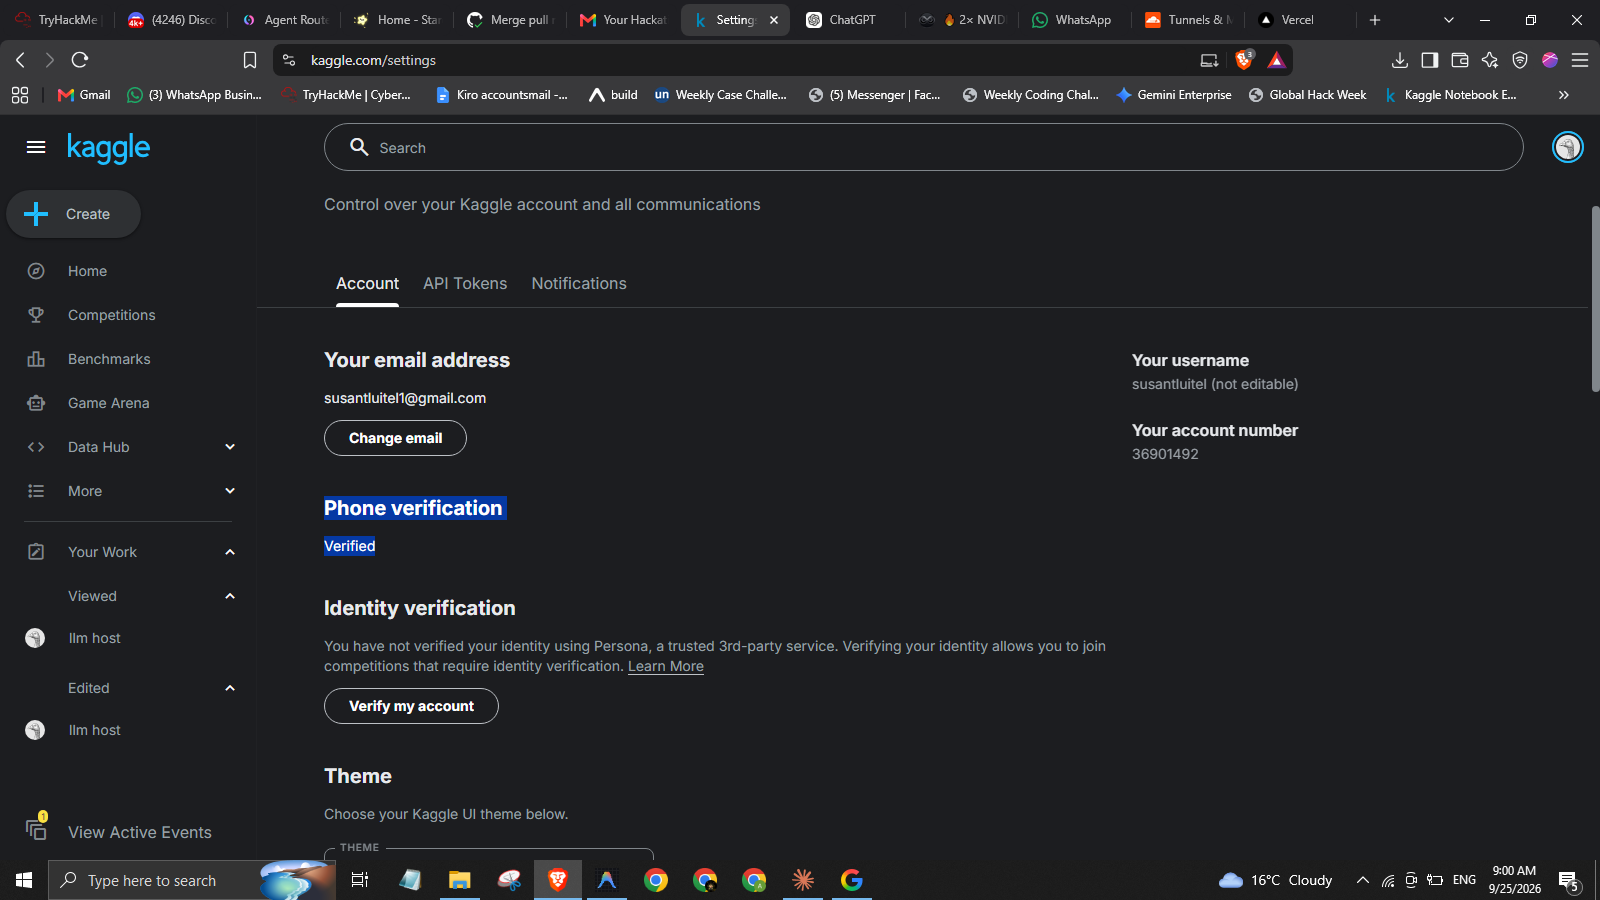
- Click your profile avatar in the top right corner and open Settings (or visit
kaggle.com/settings). - Scroll to the Phone verification section.
- Enter your mobile phone number and submit the verification code sent via SMS.
- Once completed, your settings page will display Phone verification: Verified.
Note: Use a standard mobile phone number. Virtual numbers and disposable VoIP numbers are rejected by Kaggle's verification system.
Step 3: Create a New Notebook
Navigate to the Kaggle dashboard:
- Click the + Create button in the left sidebar.
- Select New Notebook.
- Kaggle opens a web-based Jupyter environment with a default Python template.
Step 4: Import the Notebook Code
You can download the ready-to-run template notebook prepared for this guide:
📥 Download Notebook Template
Pre-configured for 2× NVIDIA T4 GPUs with Ollama, multi-GPU layer splitting, 64K context, and Cloudflare tunnel.
⚡ Download kantarajluitel.ipynbTo import it into Kaggle:
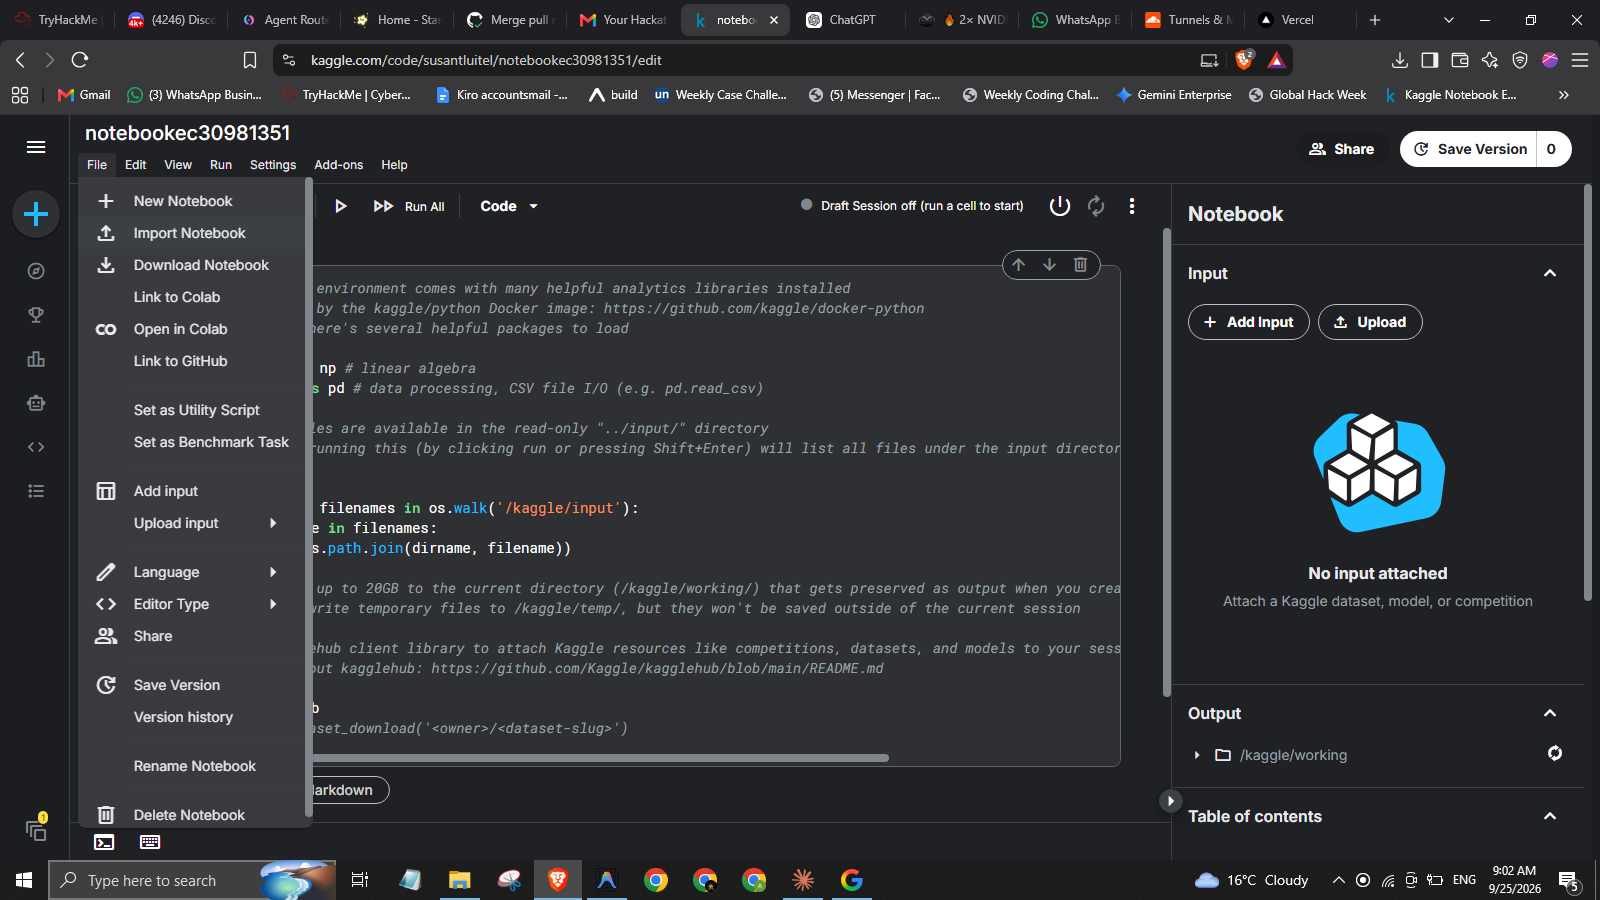
- Click File in the notebook top menu.
- Select Import Notebook.
- Drag and drop the downloaded
kantarajluitel.ipynbfile or browse to upload it.
Step 5: Select 2× NVIDIA T4 GPUs
By default, notebooks start with the accelerator turned off (CPU only). To turn on dual T4 GPUs:
- In the notebook top navigation bar, click Settings.
- Hover over Accelerator.
- Select GPU T4 ×2 from the sub-menu.
- Also verify that Internet is toggled ON in the same Settings menu so the notebook can download system packages and model weights.
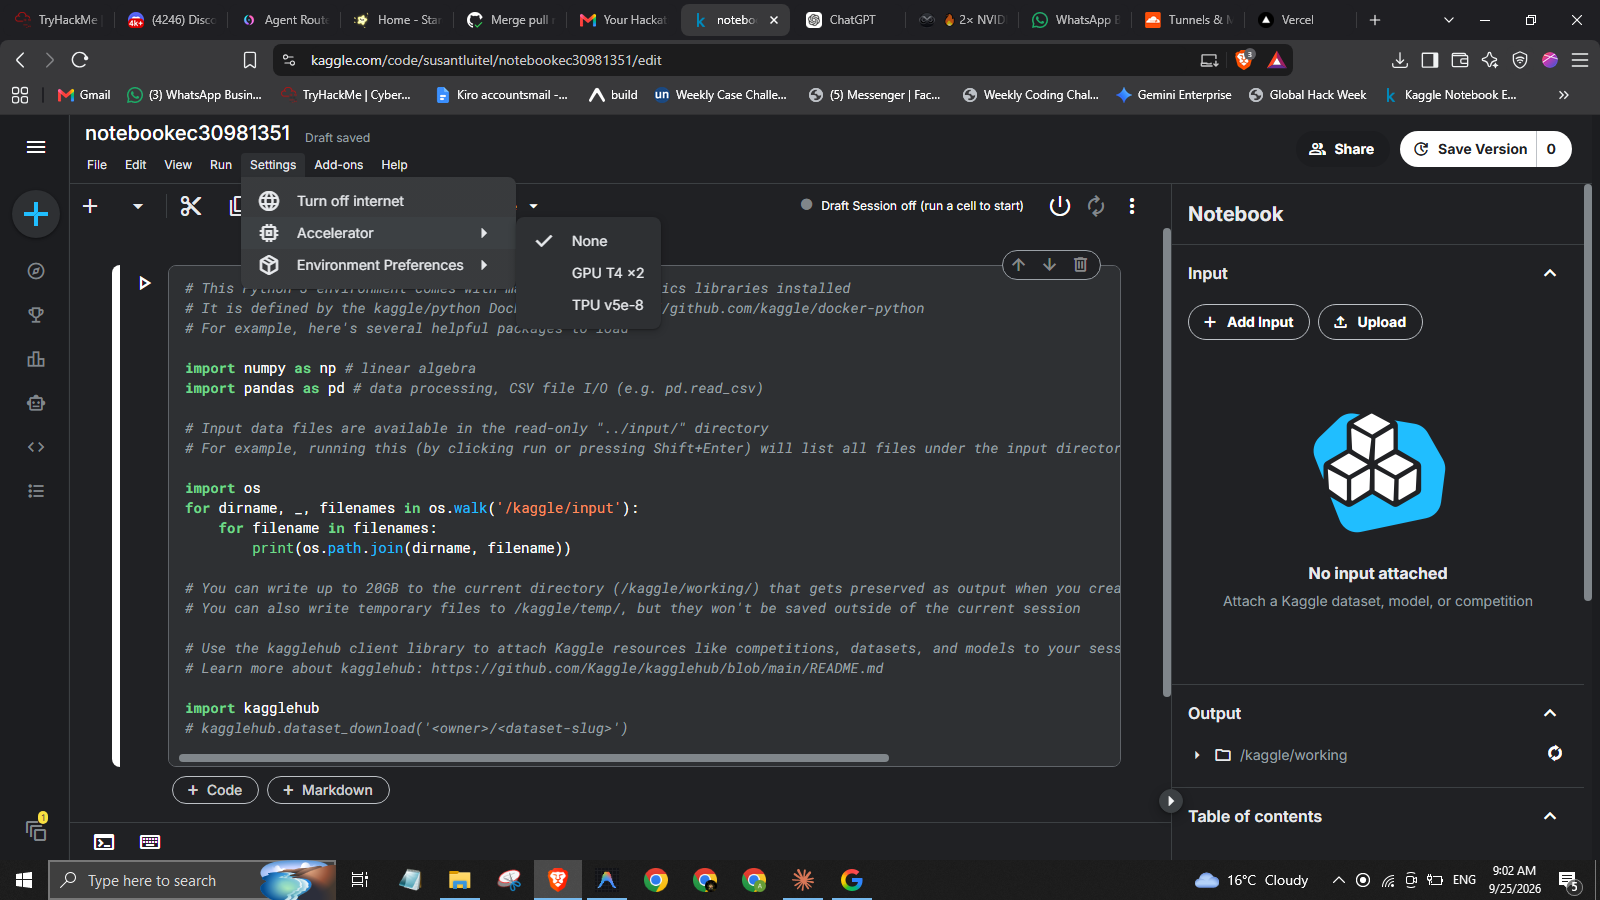
Step 6: Confirm the Accelerator Allocation
A confirmation modal will appear detailing the quota terms:
"Turning on GPU T4 ×2 will reduce the number of CPUs available and will only speed up image processing and neural networks. Availability is limited to 30 hours per week."
Click Turn on GPU T4 ×2 to start the session.
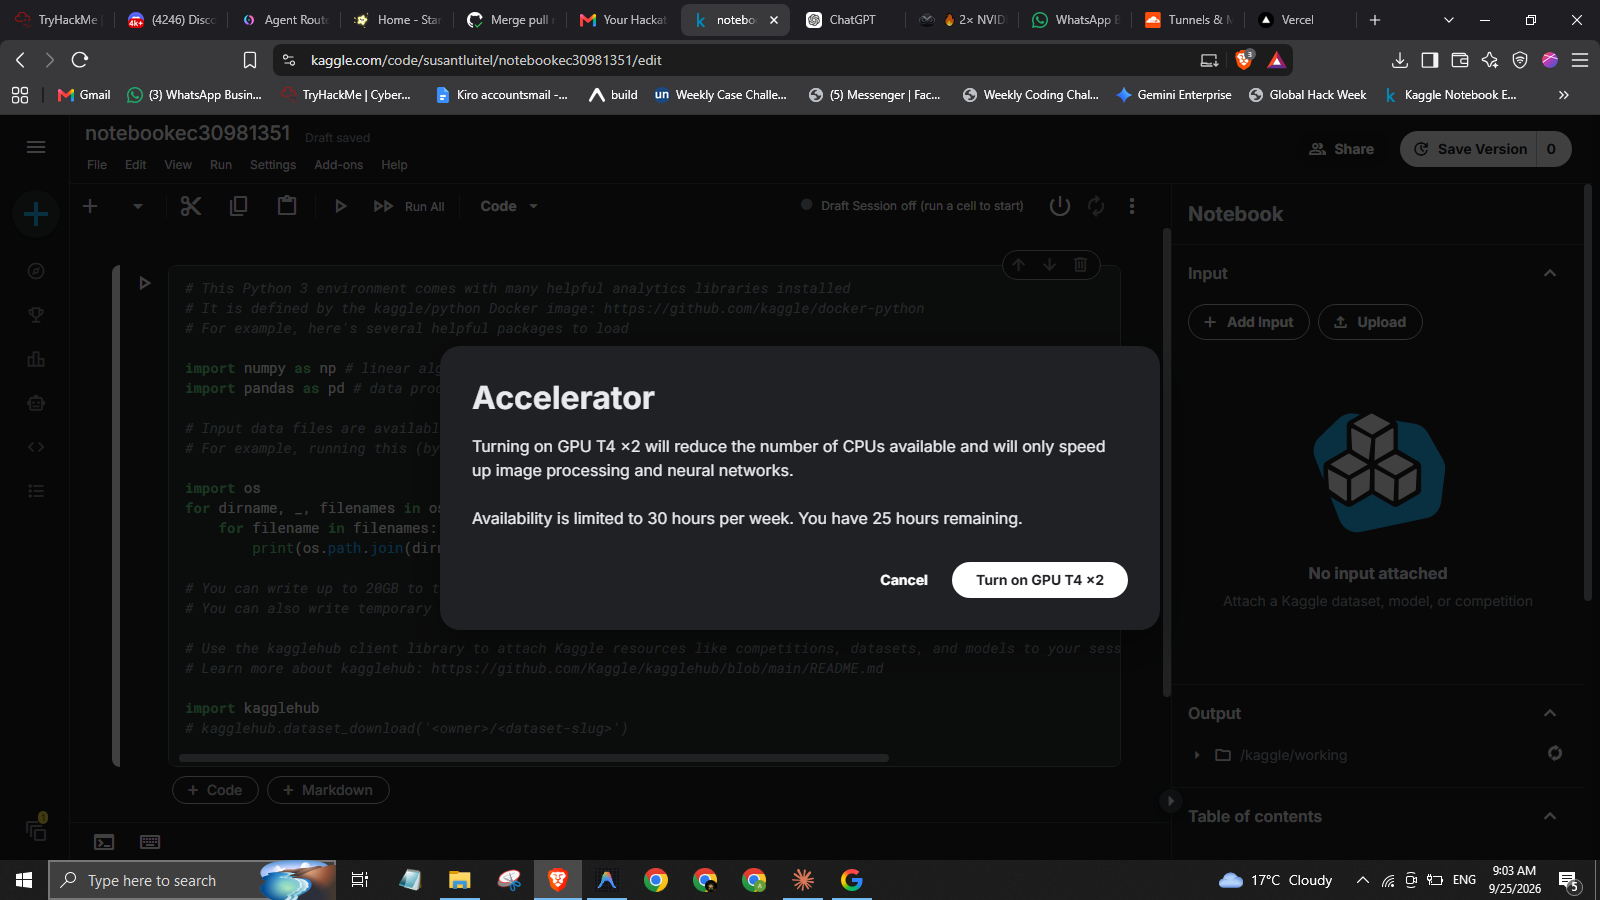
Your notebook runtime will restart and connect to a GPU-backed virtual machine.
Critical Rule: Run the Code Cells One by One
Do not click "Run All".
When working with background daemons, heavy downloads, and multi-GPU memory allocation, clicking "Run All" creates race conditions that cause notebook failures:
- Background service readiness: Ollama runs as a background process (
subprocess.Popen). If subsequent cells attempt to call the API before the server socket binds, calls will fail with connection refused errors. - Disk quota management: The 27B model weighs approximately 17 GB. Kaggle's working disk limit is 20 GB. Running cells prematurely can lead to duplicate downloads that fill the scratch disk (
No space left on device). - GPU memory verification: Running sequentially lets you inspect
nvidia-smiafter each step to confirm that weights are split evenly across GPU 0 and GPU 1 rather than falling back to CPU RAM.
Code Breakdown: Line-by-Line Explanation of kantarajluitel.ipynb
Here is an explanation of what each cell and command accomplishes inside the notebook:
Cell 1: Verifying the Dual GPUs
!nvidia-smi
- Calls the NVIDIA System Management Interface.
- Confirms that two separate physical devices (
Tesla T4, each with ~15,360 MiB memory) are attached to your virtual machine before any Python code runs.
Cell 2: Installing Ollama and Compression Utilities
!apt-get update -qq
!apt-get install -y -qq zstd
!curl -fsSL https://ollama.com/install.sh | sh
!which ollama
!ollama --version
apt-get update -qq: Updates Debian package index quietly without terminal spam.apt-get install -y -qq zstd: Installs Facebook's Zstandard compression tool, required by Ollama for extracting modern compressed archives.curl -fsSL https://ollama.com/install.sh | sh: Downloads and runs the official Ollama Linux installation script, placing the binary in/usr/local/bin/ollama.!which ollama&!ollama --version: Confirms the binary is located and checks installed version.
Cell 3: Starting Ollama with Multi-GPU and Flash Attention
import os
import shutil
import subprocess
import time
import urllib.request
from pathlib import Path

OLLAMA_URL = "http://127.0.0.1:11434"
OLLAMA_MODELS = Path("/kaggle/working/ollama-models")
SOURCE_MODEL = "hf.co/JonathanColetti/Qwen3.8-27B-Uncensored-GGUF:Q4_K_M"
MTP_MODEL = "qwen3.8-27b-uncensored-mtp"

NUM_CTX = 65536
DRAFT_TOKENS = 2

OLLAMA_MODELS.mkdir(parents=True, exist_ok=True)
os.environ["OLLAMA_MODELS"] = str(OLLAMA_MODELS)
OLLAMA_MODELS = Path("/kaggle/working/ollama-models"): Directs Ollama to store downloaded weights inside/kaggle/workinginstead of the default root directory (/root/.ollama), ensuring sufficient disk space.NUM_CTX = 65536: Configures a 64K context window for long-context reasoning.DRAFT_TOKENS = 2: Configures speculative decoding (Multi-Token Prediction) to draft 2 candidate tokens per step, speeding up generation.
OLLAMA_ENV = os.environ.copy()
OLLAMA_ENV.update({
    "OLLAMA_HOST": "127.0.0.1:11434",
    "OLLAMA_MODELS": str(OLLAMA_MODELS),
    "OLLAMA_KEEP_ALIVE": "-1",
    "OLLAMA_FLASH_ATTENTION": "1",
    "OLLAMA_KV_CACHE_TYPE": "q8_0",
    "OLLAMA_CONTEXT_LENGTH": str(NUM_CTX),
    "OLLAMA_NUM_PARALLEL": "1",
    "OLLAMA_MAX_LOADED_MODELS": "1",
})
"OLLAMA_KEEP_ALIVE": "-1": Prevents Ollama from unloading the model from GPU VRAM after idle periods."OLLAMA_FLASH_ATTENTION": "1": Enables FlashAttention kernels to reduce memory usage during long context lookups."OLLAMA_KV_CACHE_TYPE": "q8_0": Quantizes the key-value cache to 8-bit precision, conserving VRAM so 64K tokens fit comfortably within the 32GB total memory limit.
if not ollama_ready():
    server_log = open("/tmp/ollama-server.log", "a")
    ollama_server_process = subprocess.Popen(
        [OLLAMA_BIN, "serve"],
        env=OLLAMA_ENV,
        stdout=server_log,
        stderr=subprocess.STDOUT,
    )
    for _ in range(60):
        if ollama_ready():
            break
        time.sleep(1)
- Launches
ollama servein the background with the custom environment configuration, redirecting output logs to/tmp/ollama-server.log. - Polls
http://127.0.0.1:11434/api/tagsup to 60 seconds until the daemon responds.
Cell 4: Pulling the 27B Quantized Model Directly
pull_args = [OLLAMA_BIN, "pull", SOURCE_MODEL]
result = subprocess.run(pull_args, env=OLLAMA_ENV)
if result.returncode != 0:
    subprocess.run([OLLAMA_BIN, "pull", "--insecure", SOURCE_MODEL], env=OLLAMA_ENV, check=True)
- Downloads
Qwen3.8-27B-Uncensored-GGUF:Q4_K_Mdirectly from Hugging Face through Ollama's direct pull mechanism. - Why this matters: Downloading the
.ggufmanually withwgetand then runningollama createwould duplicate the 17 GB file, immediately exhausting Kaggle's 20 GB disk limit. The direct pull streams layers straight into the model store.
Cell 7: Creating the MTP Speculative Decoding Model
payload = {
    "model": MTP_MODEL,
    "from": SOURCE_MODEL,
    "parameters": {
        "draft_num_predict": DRAFT_TOKENS,
        "num_ctx": NUM_CTX,
    },
    "stream": False,
}
request = urllib.request.Request(
    f"{OLLAMA_URL}/api/create",
    data=json.dumps(payload).encode("utf-8"),
    headers={"Content-Type": "application/json"},
    method="POST",
)
with urllib.request.urlopen(request, timeout=300) as response:
    result = json.loads(response.read())
- Calls Ollama's
/api/createendpoint. - Re-aliases the downloaded 27B weights into a new model named
qwen3.8-27b-uncensored-mtpconfigured withdraft_num_predict: 2andnum_ctx: 65536without duplicating disk files.
Cell 8: Loading and Pinning the Model in VRAM
payload = {
    "model": MTP_MODEL,
    "prompt": "Reply with exactly: MTP is working.",
    "stream": False,
    "keep_alive": -1,
    "options": {
        "draft_num_predict": DRAFT_TOKENS,
        "num_ctx": NUM_CTX,
    },
}
request = urllib.request.Request(
    f"{OLLAMA_URL}/api/generate",
    data=json.dumps(payload).encode("utf-8"),
    headers={"Content-Type": "application/json"},
    method="POST",
)
with urllib.request.urlopen(request, timeout=600) as response:
    result = json.loads(response.read())
    print("Response:", result.get("response", "").strip())
    print("MTP model loaded and pinned.")
- Sends the warm-up inference request to load all model layers into GPU memory.
- Sets
"keep_alive": -1so the weights stay locked in VRAM for instant subsequent responses.
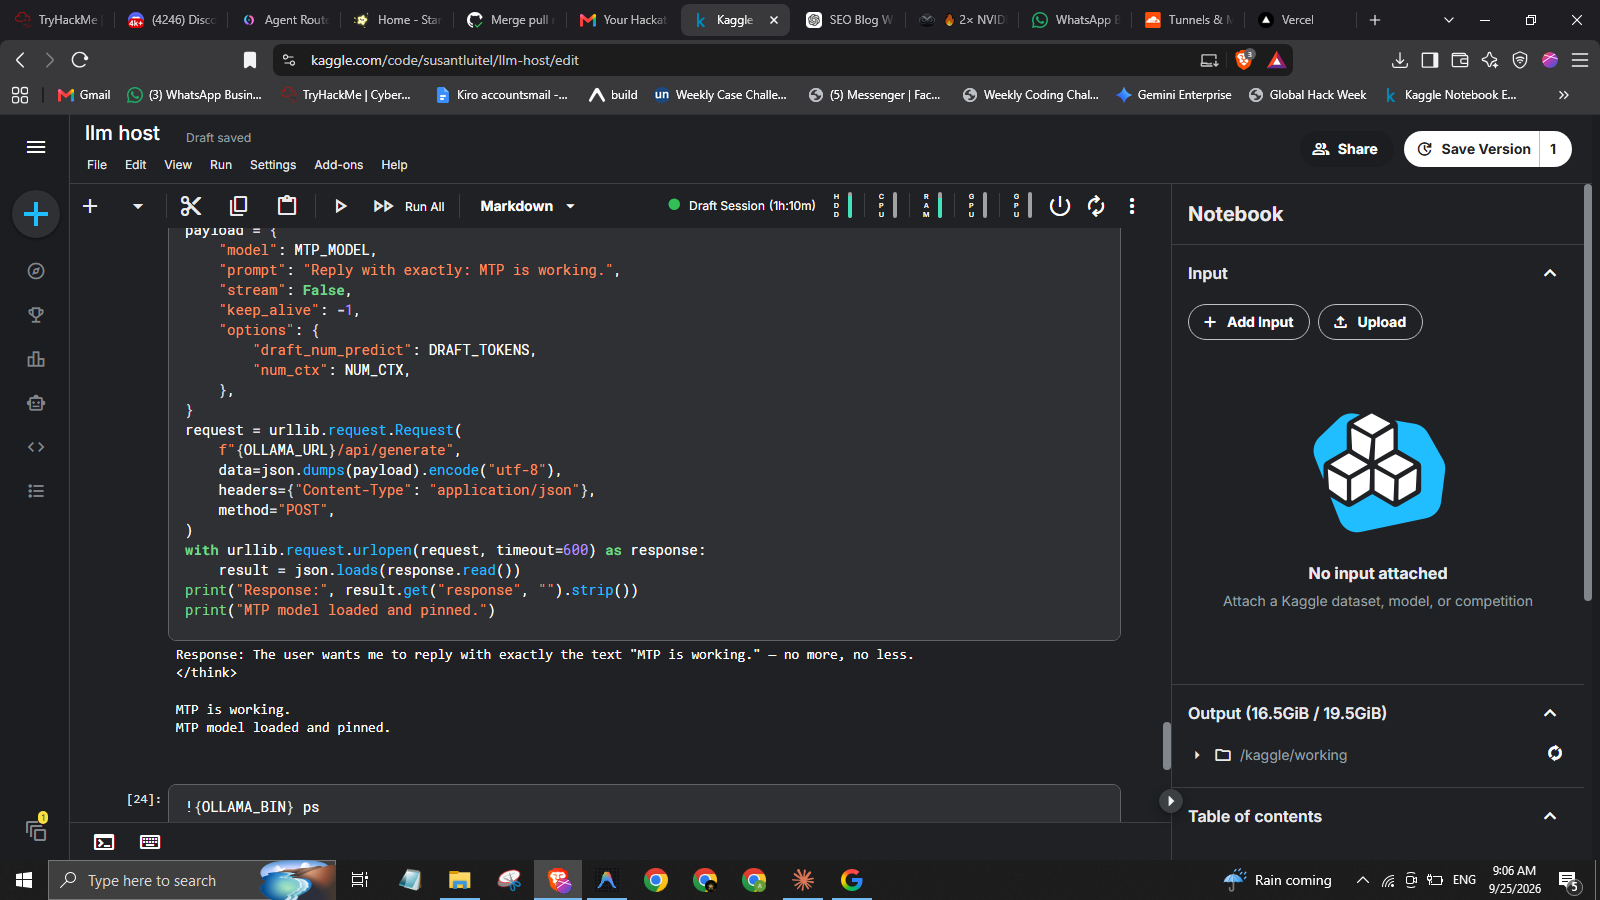
Live Output Showcase: Dual-GPU Verification
Here is the actual execution output from Step 8 running inside Kaggle:
What This Output Proves
- Successful Multi-GPU Allocation: In the top hardware monitor, both GPU 0 and GPU 1 display active usage indicators. The 27B model layers have been distributed across both 16GB cards.
- Safe Disk Utilization: The output panel shows 16.5GiB / 19.5GiB used. By using Ollama's direct streaming pull, the entire 17GB model fits within Kaggle's 20GB limit with 3GB of breathing room.
- Speculative Decoding Active: The model reasoned through its
<think>block and answered:"MTP is working." - Permanent In-Memory Session: The confirmation message
MTP model loaded and pinnedverifies that all subsequent API calls will execute with zero model loading delay.
What You Can Do With This Setup
Having a private 27B model running on 32GB of GPU VRAM with a 64K context window opens up several practical capabilities:
- Host a Private OpenAI-Compatible API: Cells 10–11 install Cloudflare Tunnel and expose a public URL (
https://*.trycloudflare.com/v1). You can point any OpenAI-compatible client (such as Cursor, VS Code Continue, Obsidian, LibreChat, or OpenWebUI) directly to this endpoint. - Long-Document Analysis (64K Context): You can pass entire codebases, research papers, or contract documents into the prompt without truncating context.
- Uncensored Reasoning & Code Generation: The Qwen 27B Uncensored model is suitable for security research, unrestricted creative writing, refactoring complex code, and synthetic data generation.
- Zero Cloud Bills: You get up to 30 hours of high-grade GPU compute every week without providing credit card details or paying per-token API charges.
Frequently Asked Questions (FAQ)
Can I run a 27B model on a single T4 GPU?
No. An unquantized 27B model requires roughly 54 GB of memory. Even at 4-bit quantization (Q4_K_M), the model weights alone take about 17 GB, which exceeds the 16GB VRAM limit of a single T4. The dual-T4 configuration (16GB + 16GB = 32GB) is necessary to load the weights and keep room for KV cache.
Why do I need to run cells one by one?
Ollama is a client-server architecture. If you click "Run All", client cells will execute before the background ollama serve process has finished binding to port 11434. In addition, running cells one by one lets you check memory with nvidia-smi to ensure weights are allocated across both GPUs.
How does Multi-Token Prediction (MTP) speed up inference?
MTP is a speculative decoding technique where the model predicts candidate tokens in advance. If the draft predictions are accepted by the main model weights, multiple tokens are generated in a single forward pass, noticeably reducing generation latency on dual-GPU systems.
What happens when the Kaggle session ends?
Kaggle GPU sessions have a continuous runtime limit of up to 12 hours (with a 60-minute idle timeout). When the session ends, the temporary VM is decommissioned. You can restart the session and rerun the cells whenever you need to work again.
Is the Cloudflare Quick Tunnel secure?
The temporary trycloudflare.com URL is convenient for connecting external applications, but it does not require authentication. Anyone who has the URL can send prompts to your running session. Do not share the generated URL publicly, and do not process sensitive credentials through the temporary tunnel.
Download the Notebook
📥 Ready to Get Started?
Download kantarajluitel.ipynb directly to your machine and import it into your Kaggle workspace.
Summary
By taking advantage of Kaggle's dual NVIDIA Tesla T4 allocation, you gain access to 32GB of combined VRAM without upfront costs. Following a structured cell-by-cell execution process ensures clean dependency installation, optimal disk utilization under 20GB, and dependable multi-GPU layer distribution for large language models.